 |
| LEGO Parts |
| B. Lego Technic Parts, beams E. H. O. R. U. X. LV. LX. LT. |
| C. Lego plates / flats, red, blue, white, yellow, green, white, grey G. J. K. W. Q. LL. LE. LN. T. |
| L. Misc. Coloured Bricks & Flats; Brown, Cream, Pink, Beige, Curry, Buff, Tan LM. LH. LA. LB. LC. |
| M. Minifigure Accessories- Hair, headwear BEA. BEB. BEC. BED. BEE. BEF. BEG. BEH. BEJ. BEK. |
| N. Lego Bricks, black, red, yellow, grey, blue, white D. P. I. S. F. V. BK. LR. LS. LQ. BP. BQ. #D. |
| Z. Gears / Cogs, Pulley Wheels, Axles / shafts / rods, Wheels, string, tyres and hubs. AB. A. BD. |
| AD. Connectors, Bushes, tracks, chains, rubber bands CA. AA. |
| AF. Pneumatics, tube, pipe, suspension, springs, pumps, actuators, switches, 'T's |
| AG. Engine Parts, Motors, Electrical, lights, switches, sensors, cables, pull-back motors, sirens. |
| AJ. Star Wars Theme AJ2, AJ3, AJ4, AJ5, RX. |
| AK. Harry Potter Minifigures, Lone Ranger, Galaxy Squad, Alien Conquest, Studio's, Movie, Belville |
| AM. Lego Toy Story, Atlantis, Ninjago, Spongebob BM2. XA. BJ. |
| AP. Vehicle Parts, plane, helicopter, aircraft, aeroplane parts AQ. AQA. AQB. AQC. AQD. AQE. AQG. |
| AR. Minifigures pg1, Mars Mission, Fabuland, Jack Stone, Technic & Family ATA. ARA. CX. CY. DA. CVQ. |
| AU. Train Parts, boats and ship, Sport/Football, Castle/building parts, AS. AH. AL. |
| AV. Lego base boards, thin, thick & 3D. Manuals, instructions, flyers, inserts . AV2. BF. |
| AW. Parts with printed surfaces/decals AWA. AWB. CB. CC. CD. CE. CEA. CF. CG. CGA. CH. CHA. |
| AX. Trees, Plants, Road Signs, Lamp post, vintage flags, clip signs AXD. |
| AY. Doors, Windows, Shutters, Grilles, Fences, Gates, BC2. RR. RS. RQ. RR2. RT. RU. |
| BA. Clear / Translucent Lego, QA. QB. QC. QD. QE. QF. QG. |
| BB. Misc. Lego, gates, fence panels, fridge magnets, BC. BC2. GVK. |
| BCA. Structural, Girders, Beams, Supports, Stairs, Ladders, BCB. |
| LK. Lego Animals, Birds & Dinosaurs, Minifigure capes / cloaks page. MA. |
| VE. Antenna, Aerials, Fairings, Duplo, Satalite / radar dishes VJ. SA. SAA. VC. |
| CV. Lego Power Miners, Lego Simpsons, Lego Fabuland, Legends of Chima CVA. CVB. CVP. |
| BJE. Pirates of the Caribbean, Avengers, Lord of the Rings, Indiana Jones, BJH. BH2. BJ3. |
| DC. Lego Minifigure series |
| BJU. Lego Superheroes, Batman, Monster Fighters, Series, olympics, BJK. DC. KP. |
| KN. Lego Knights Kingdom, Castle Fantasy Era, Pharaoh's Quest, CVG. CVM. |
| Terms & Conditions, About Us and frequently asked questions. |
| RA. Lego Bionicle parts, Gold & Silver Lego parts page 1, RB. RC. RD. RE. RF. LF. |
| #ME. Complete Lego sets 2 |
| ME. Complete Lego sets, buy Lego by the Kilo, Lego spares packs SS. ST. |
| Spareblocks News, Leave or read feedback / comments, completed projects. |
| Q2. Harry Potter Green Parts |
| Sell your unwanted Lego |
| DG. Pneumatic tubing |
| CVQ. Lego Mars Mission |
|
|
|
|
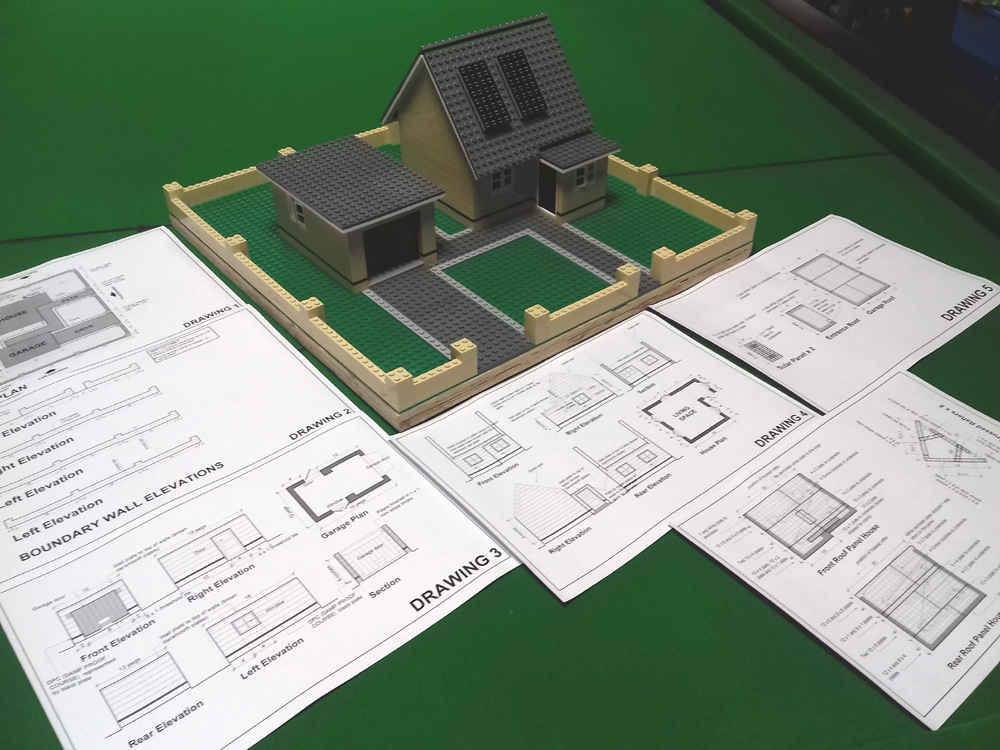
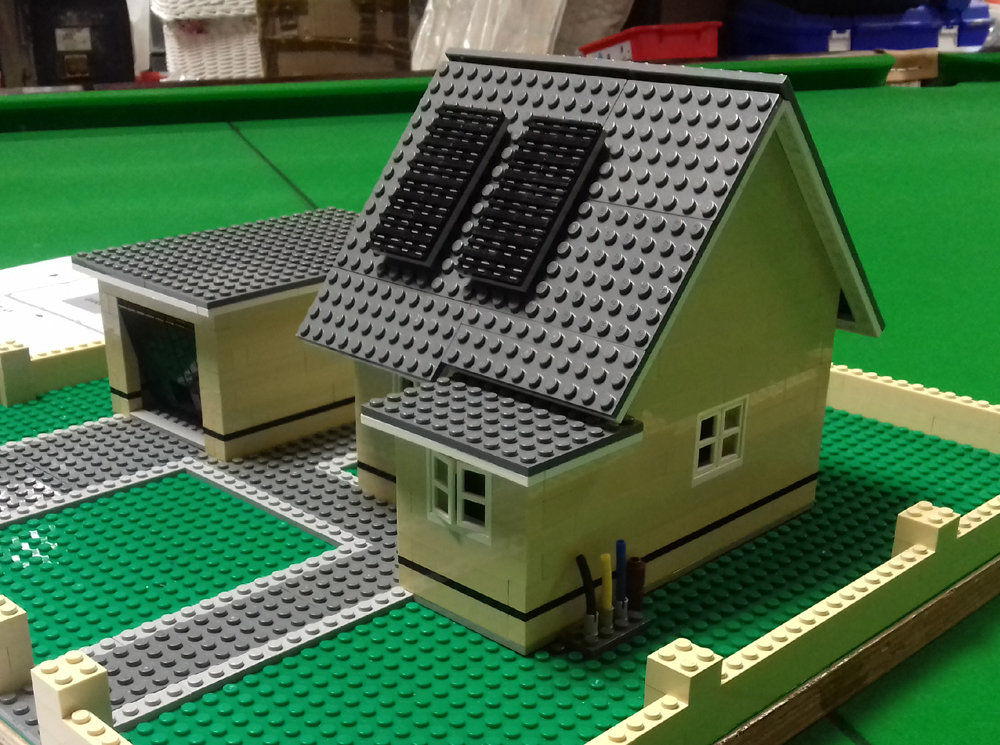
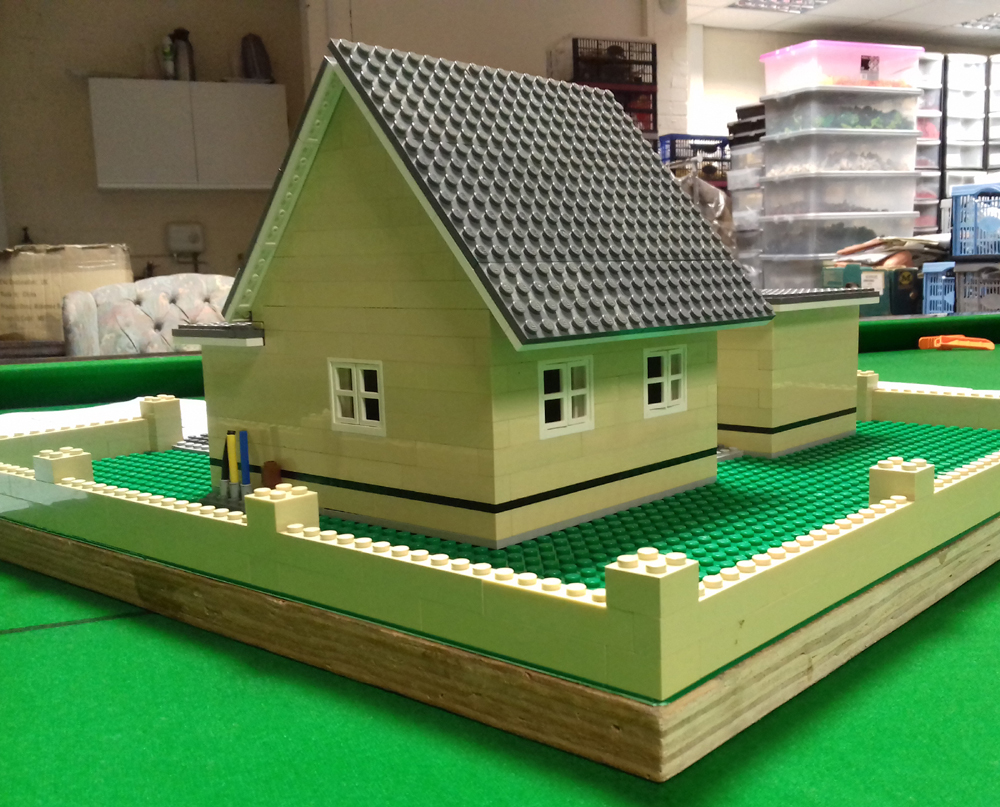
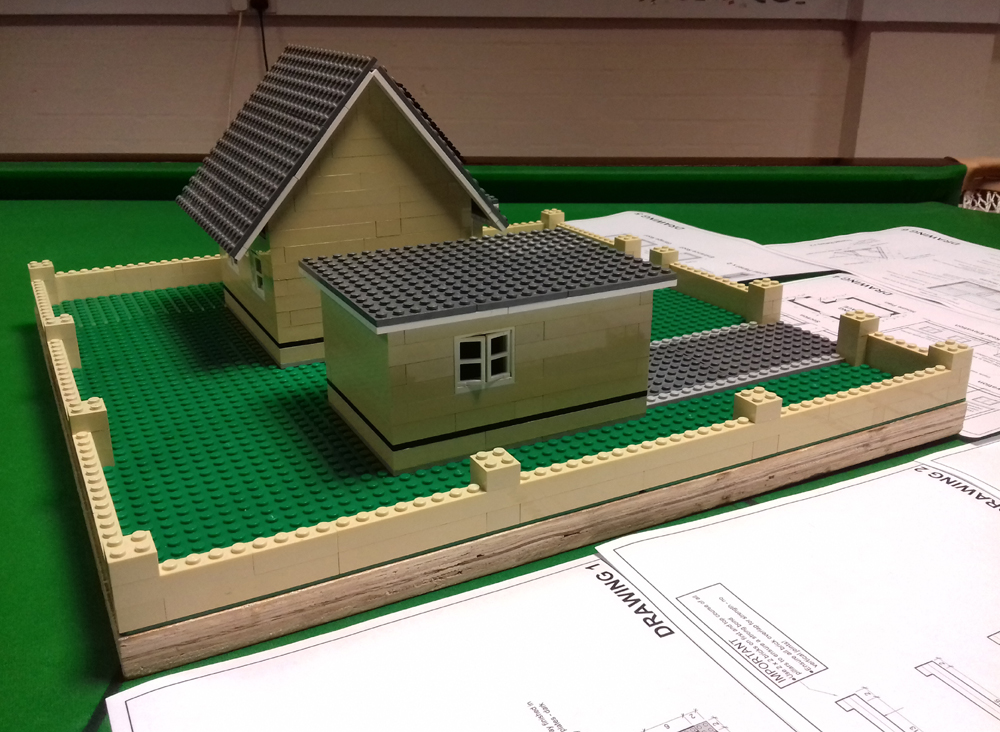
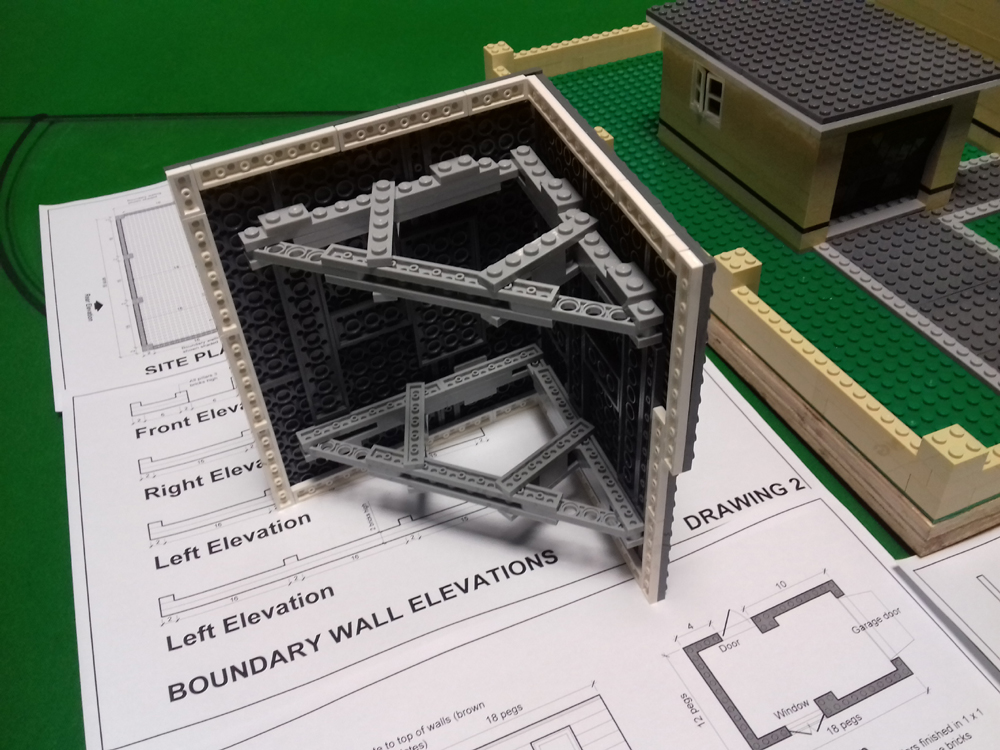
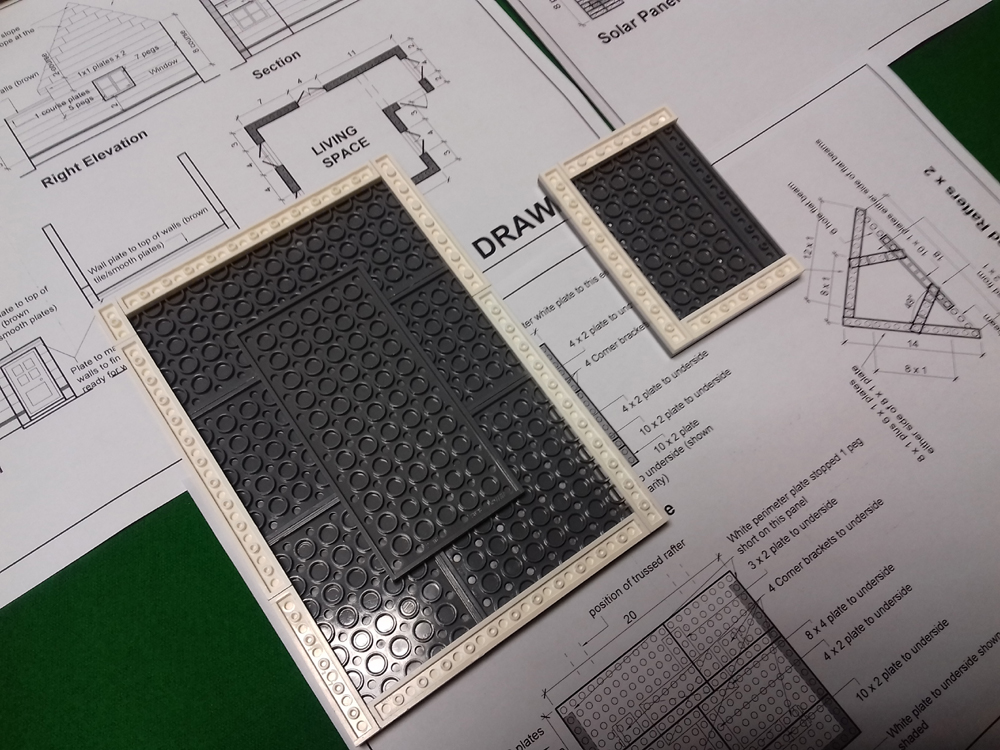
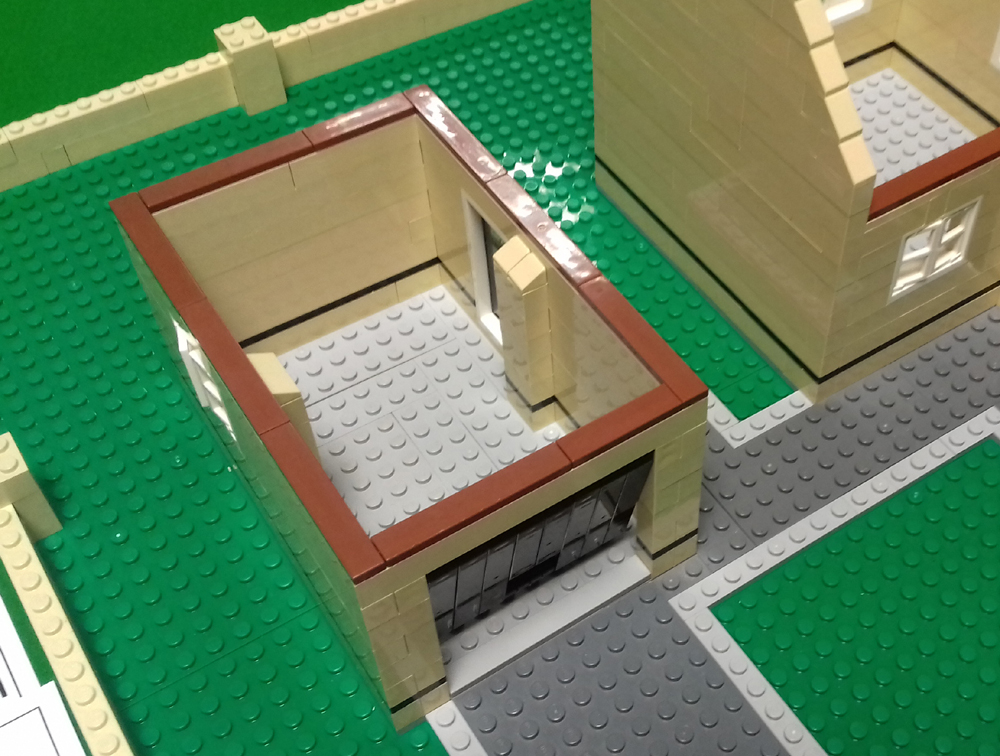
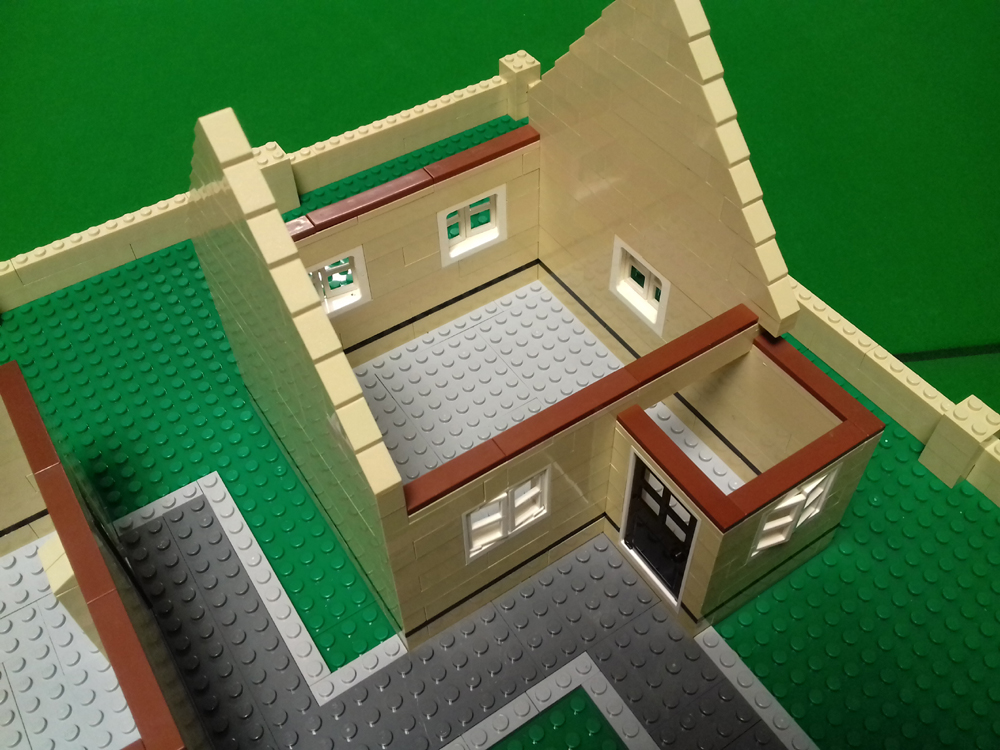
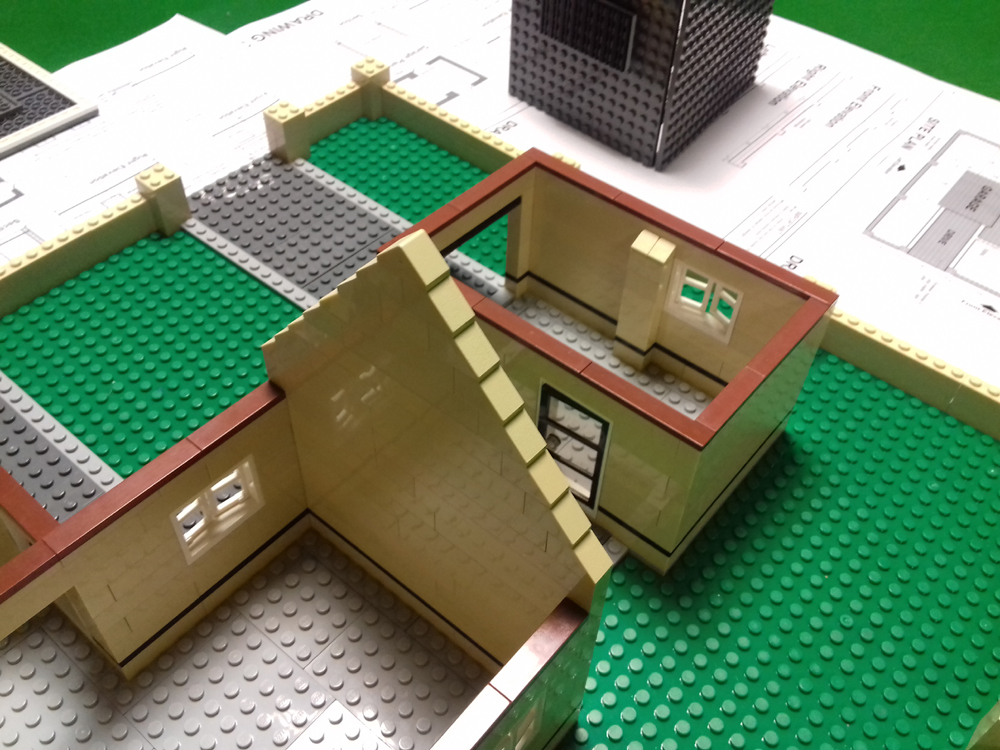
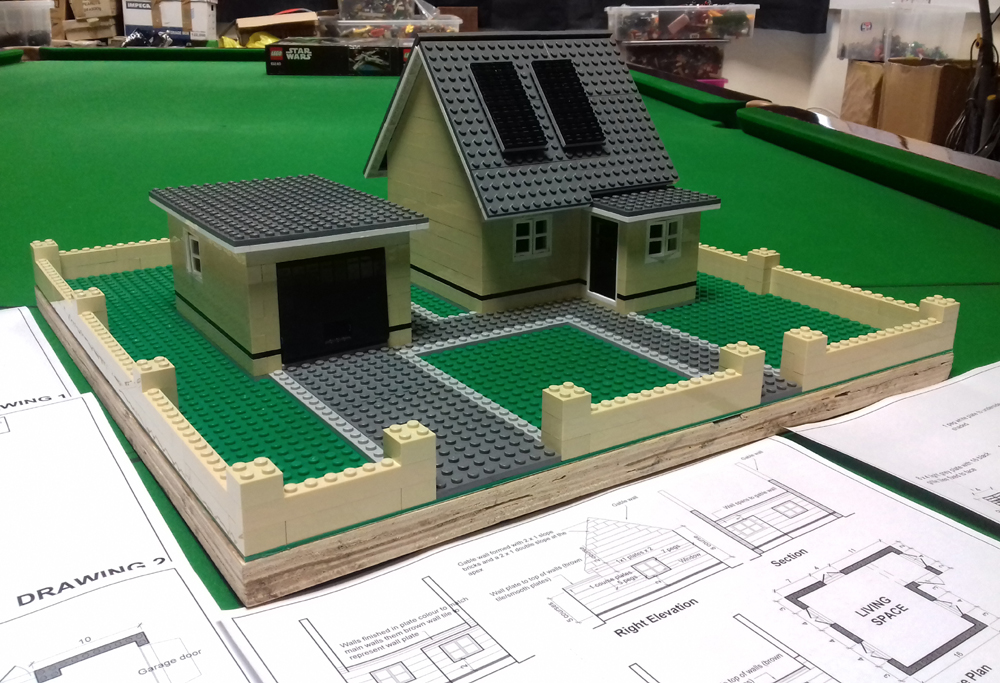
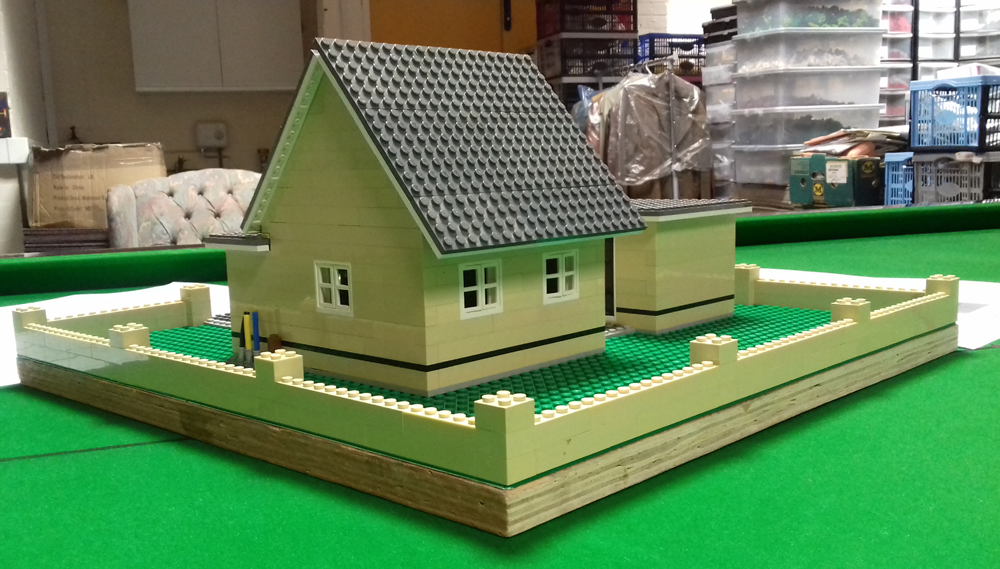
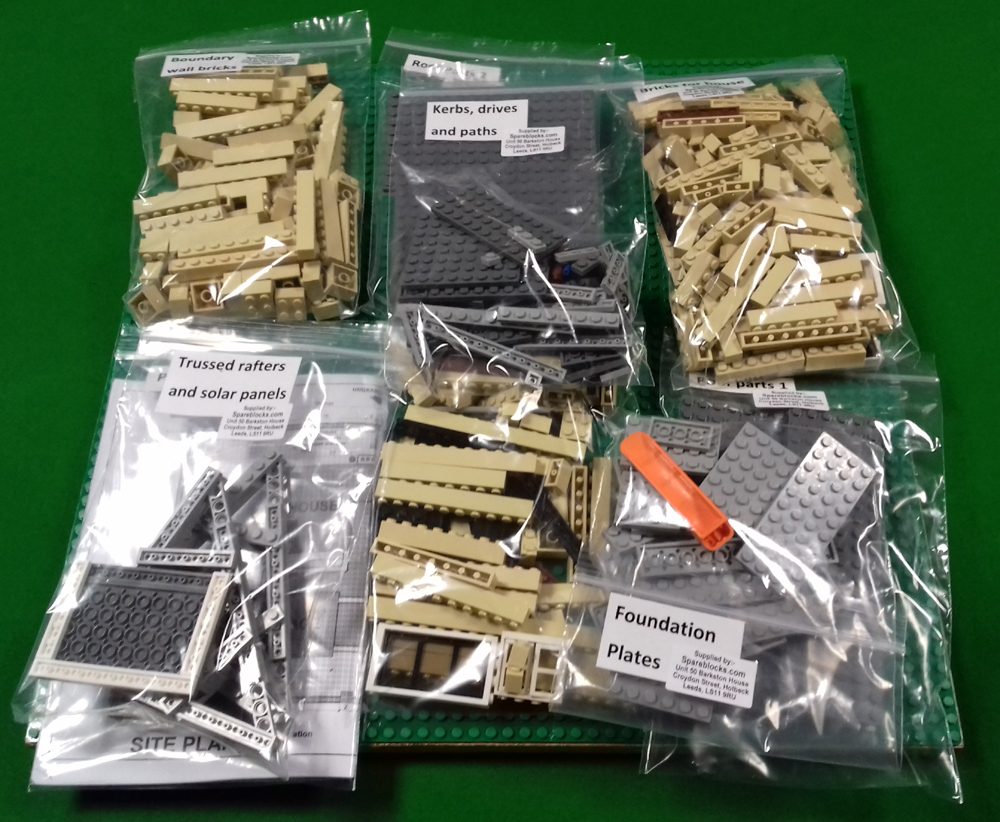
HOUSE DEVELOPMENT SITE! My
30+ years working in architecture and construction have finally paid off!...well, it did help me to assist with the development
of a learning aid that is aimed at teaching children the basics of house construction. The following photographs show a Lego
constructed house and garage on a building plot. The plans I produced for this set are in the style of real architectural
construction drawings - they are 2D and are aimed at encouraging the children to develop their abilities to understand
and correctly interpret elevations, plans. and sections. This bespoke construction set will be presented to children in a
classroom setting and groups of up to 6 children will work as a team to build it from the plans. As the build progresses,
the children are tasked to consider real world site investigation requirements and design considerations and the teacher covers
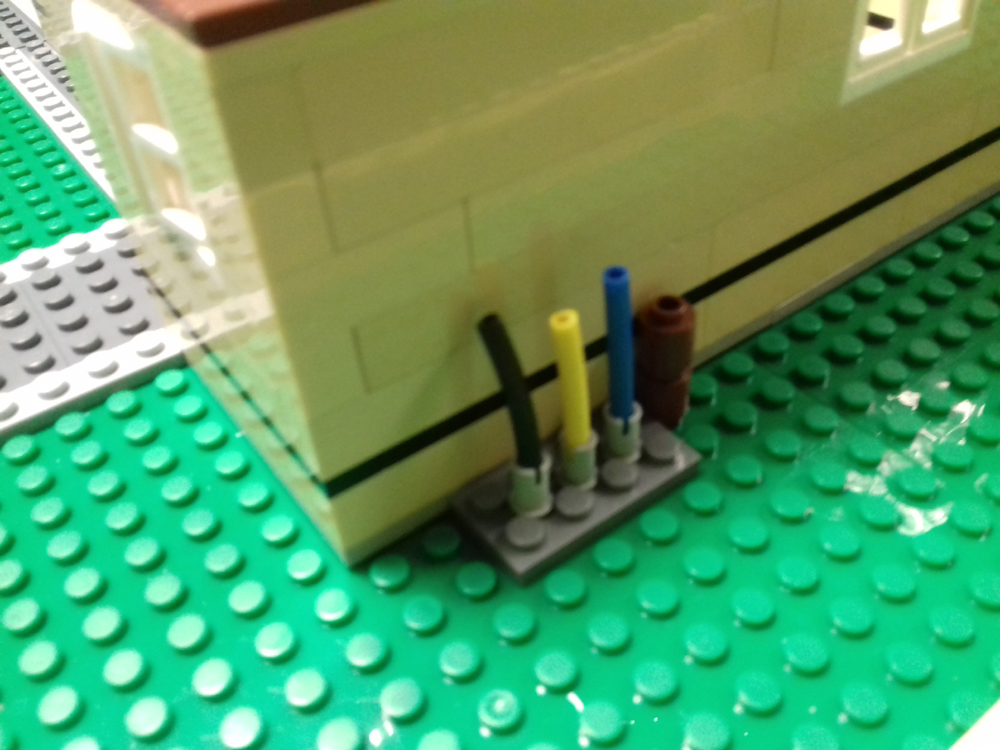
the construction techniques used when building real houses. The design incorporates foundation plates, damp proof courses,
trussed rafters, piers, pillars, brick bonding, wall plates and more which help prompt inquiry and provide opportunity for
the teacher to explain construction techniques in further detail. The set will be trialled shortly by a construction
and trade teaching professional that has delivered similar teaching programmes for many years - I am hopeful that the
introduction of Lego as a teaching aid here will significantly improve student interest and help improve learning outcomes.

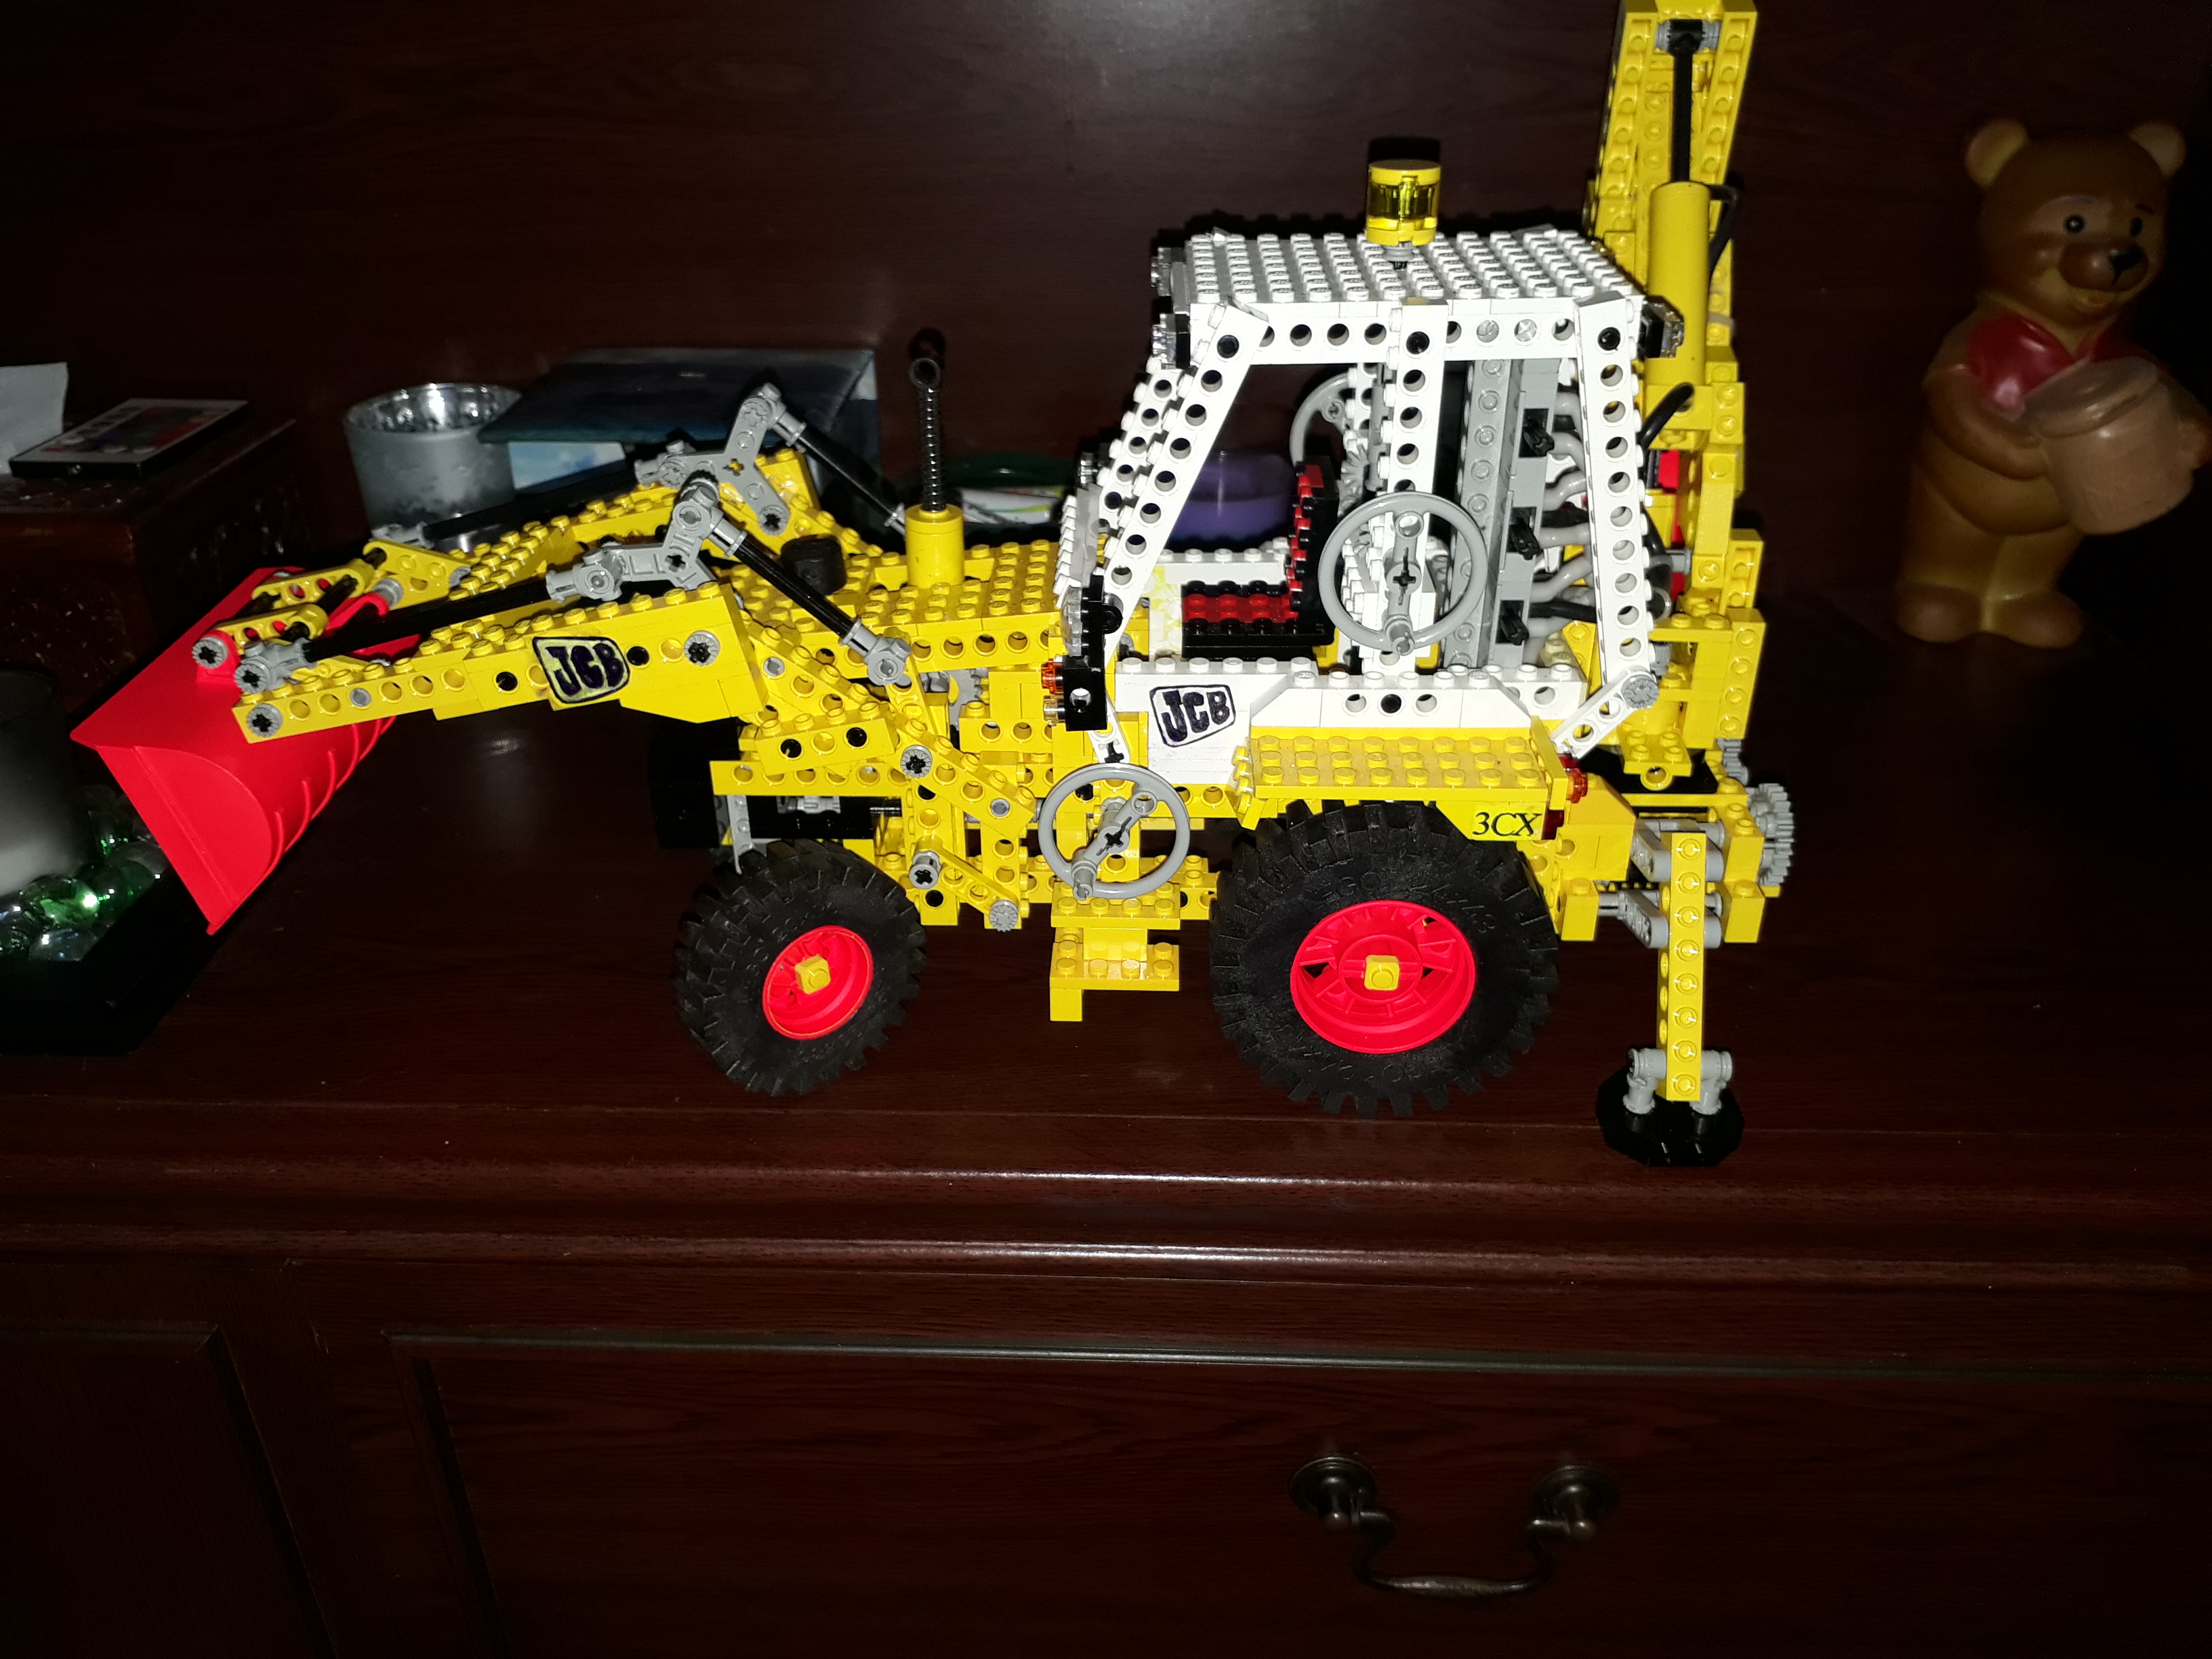
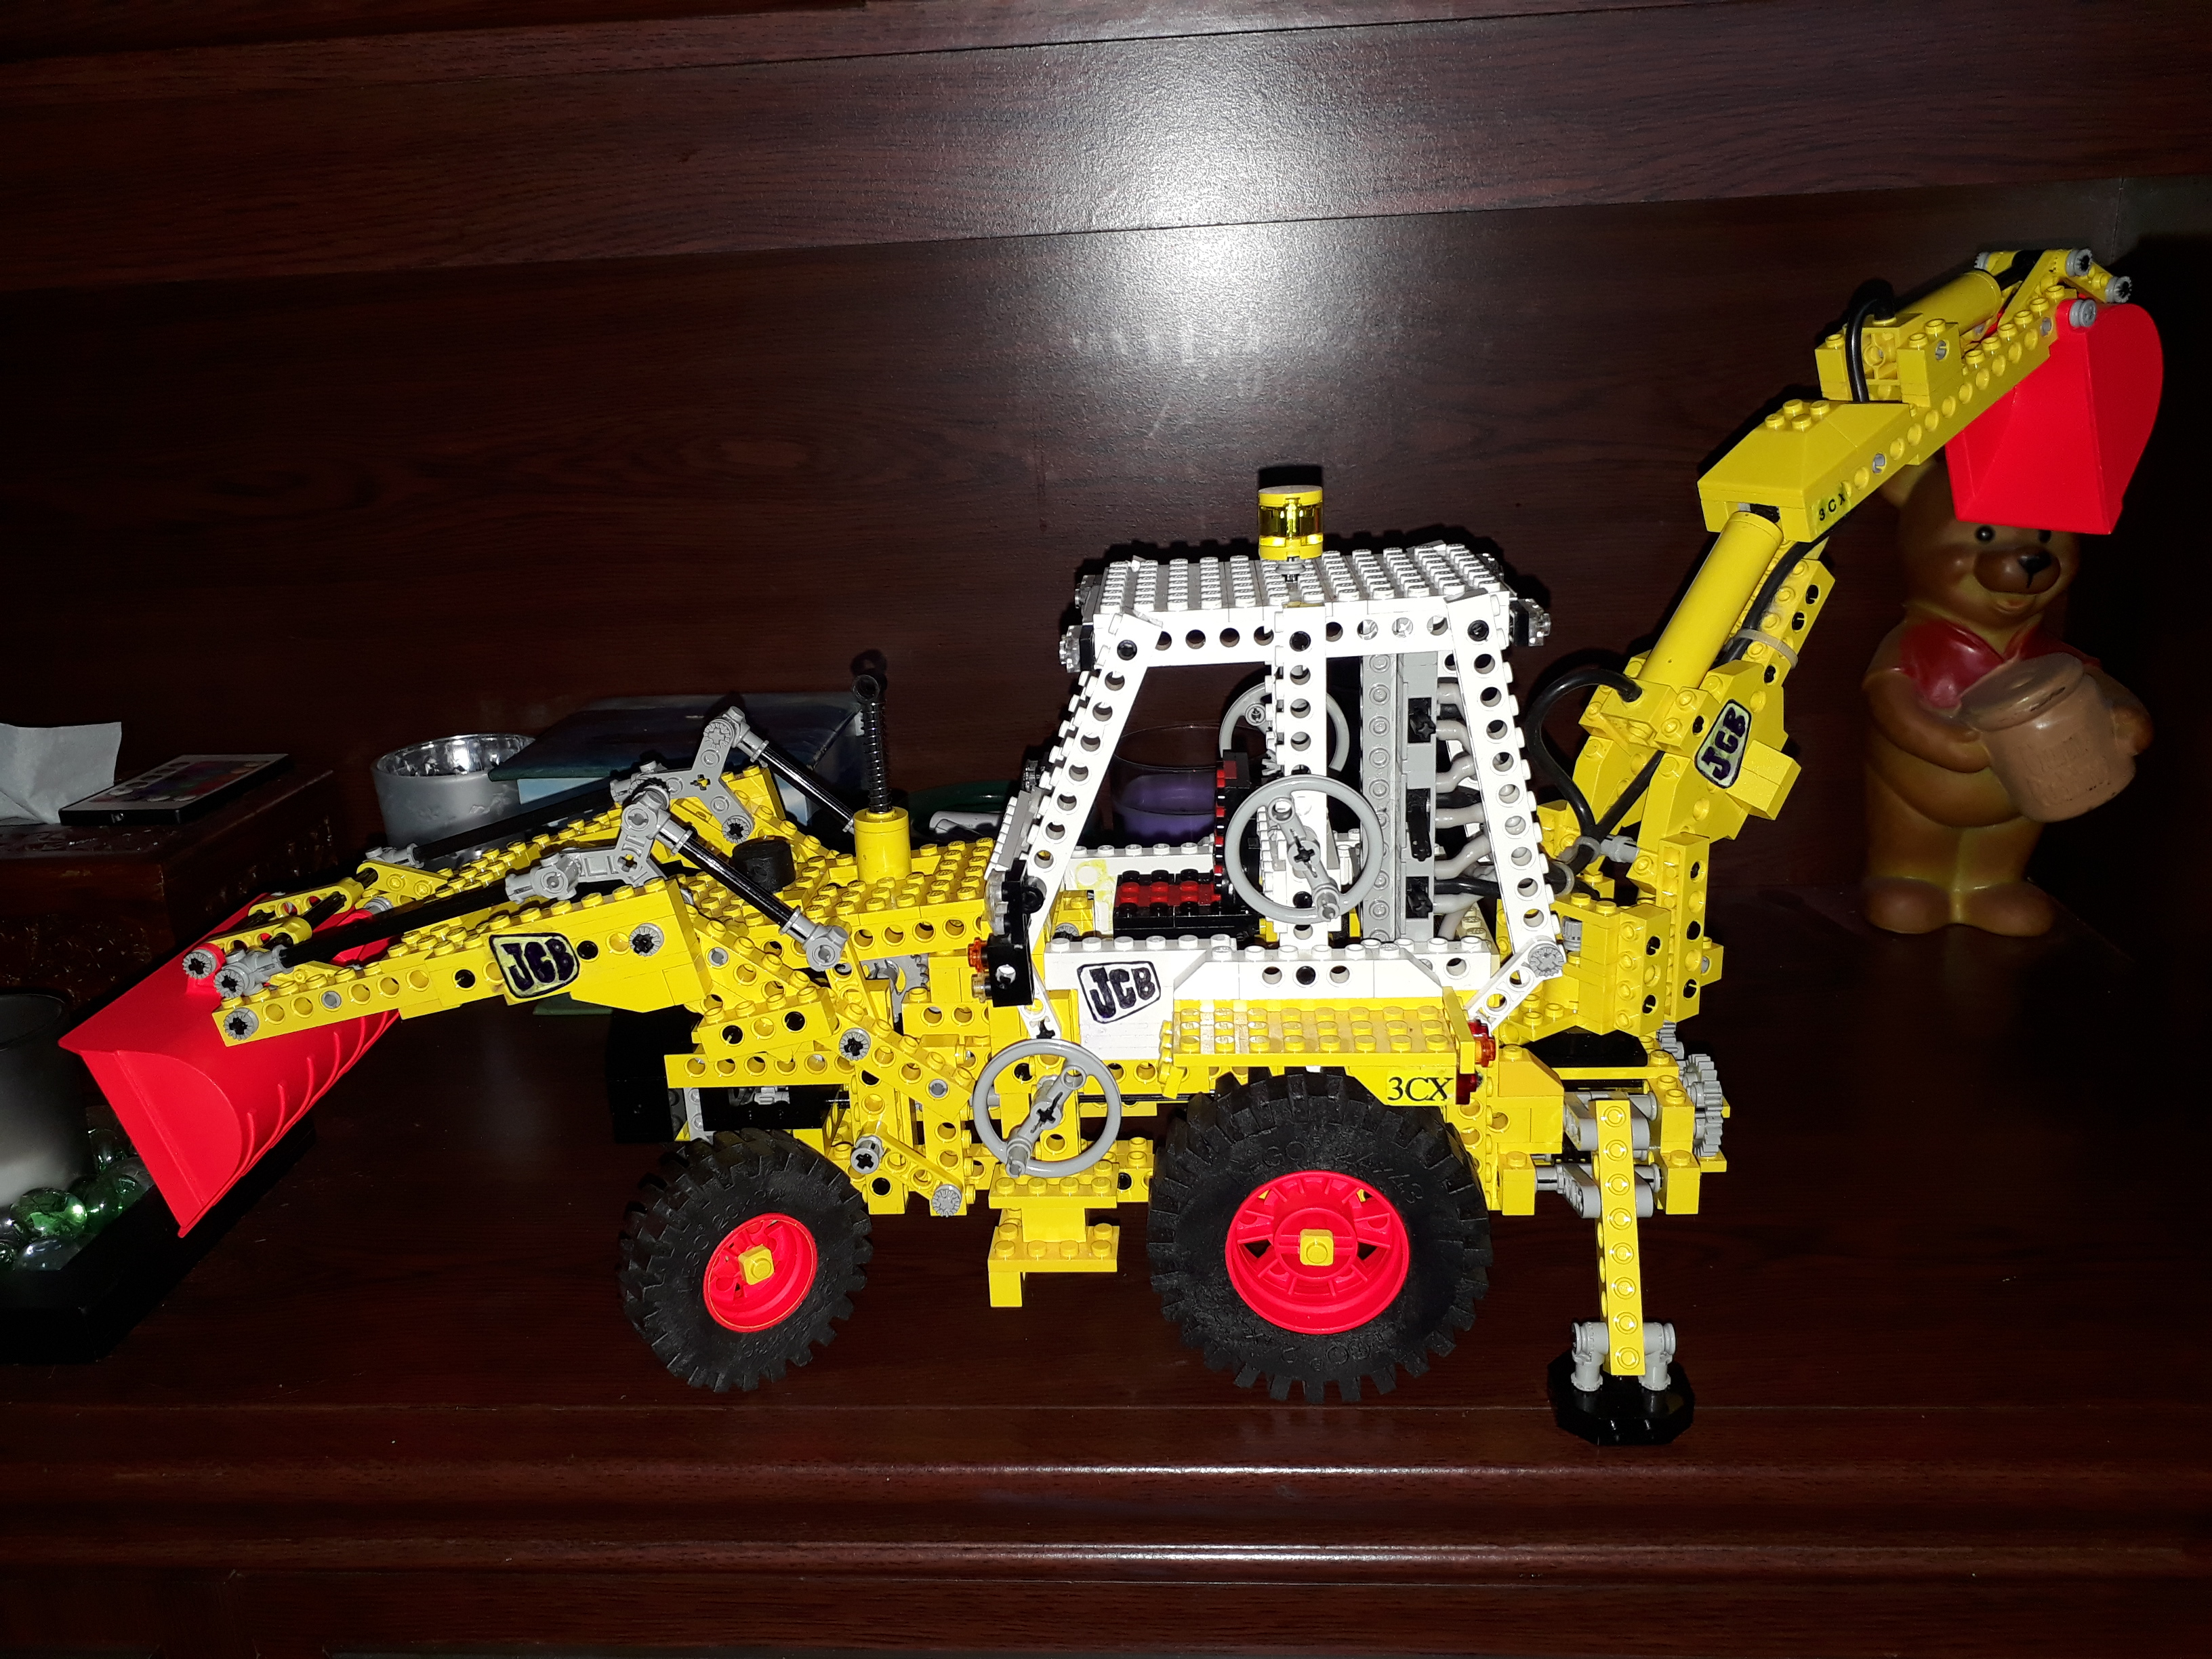
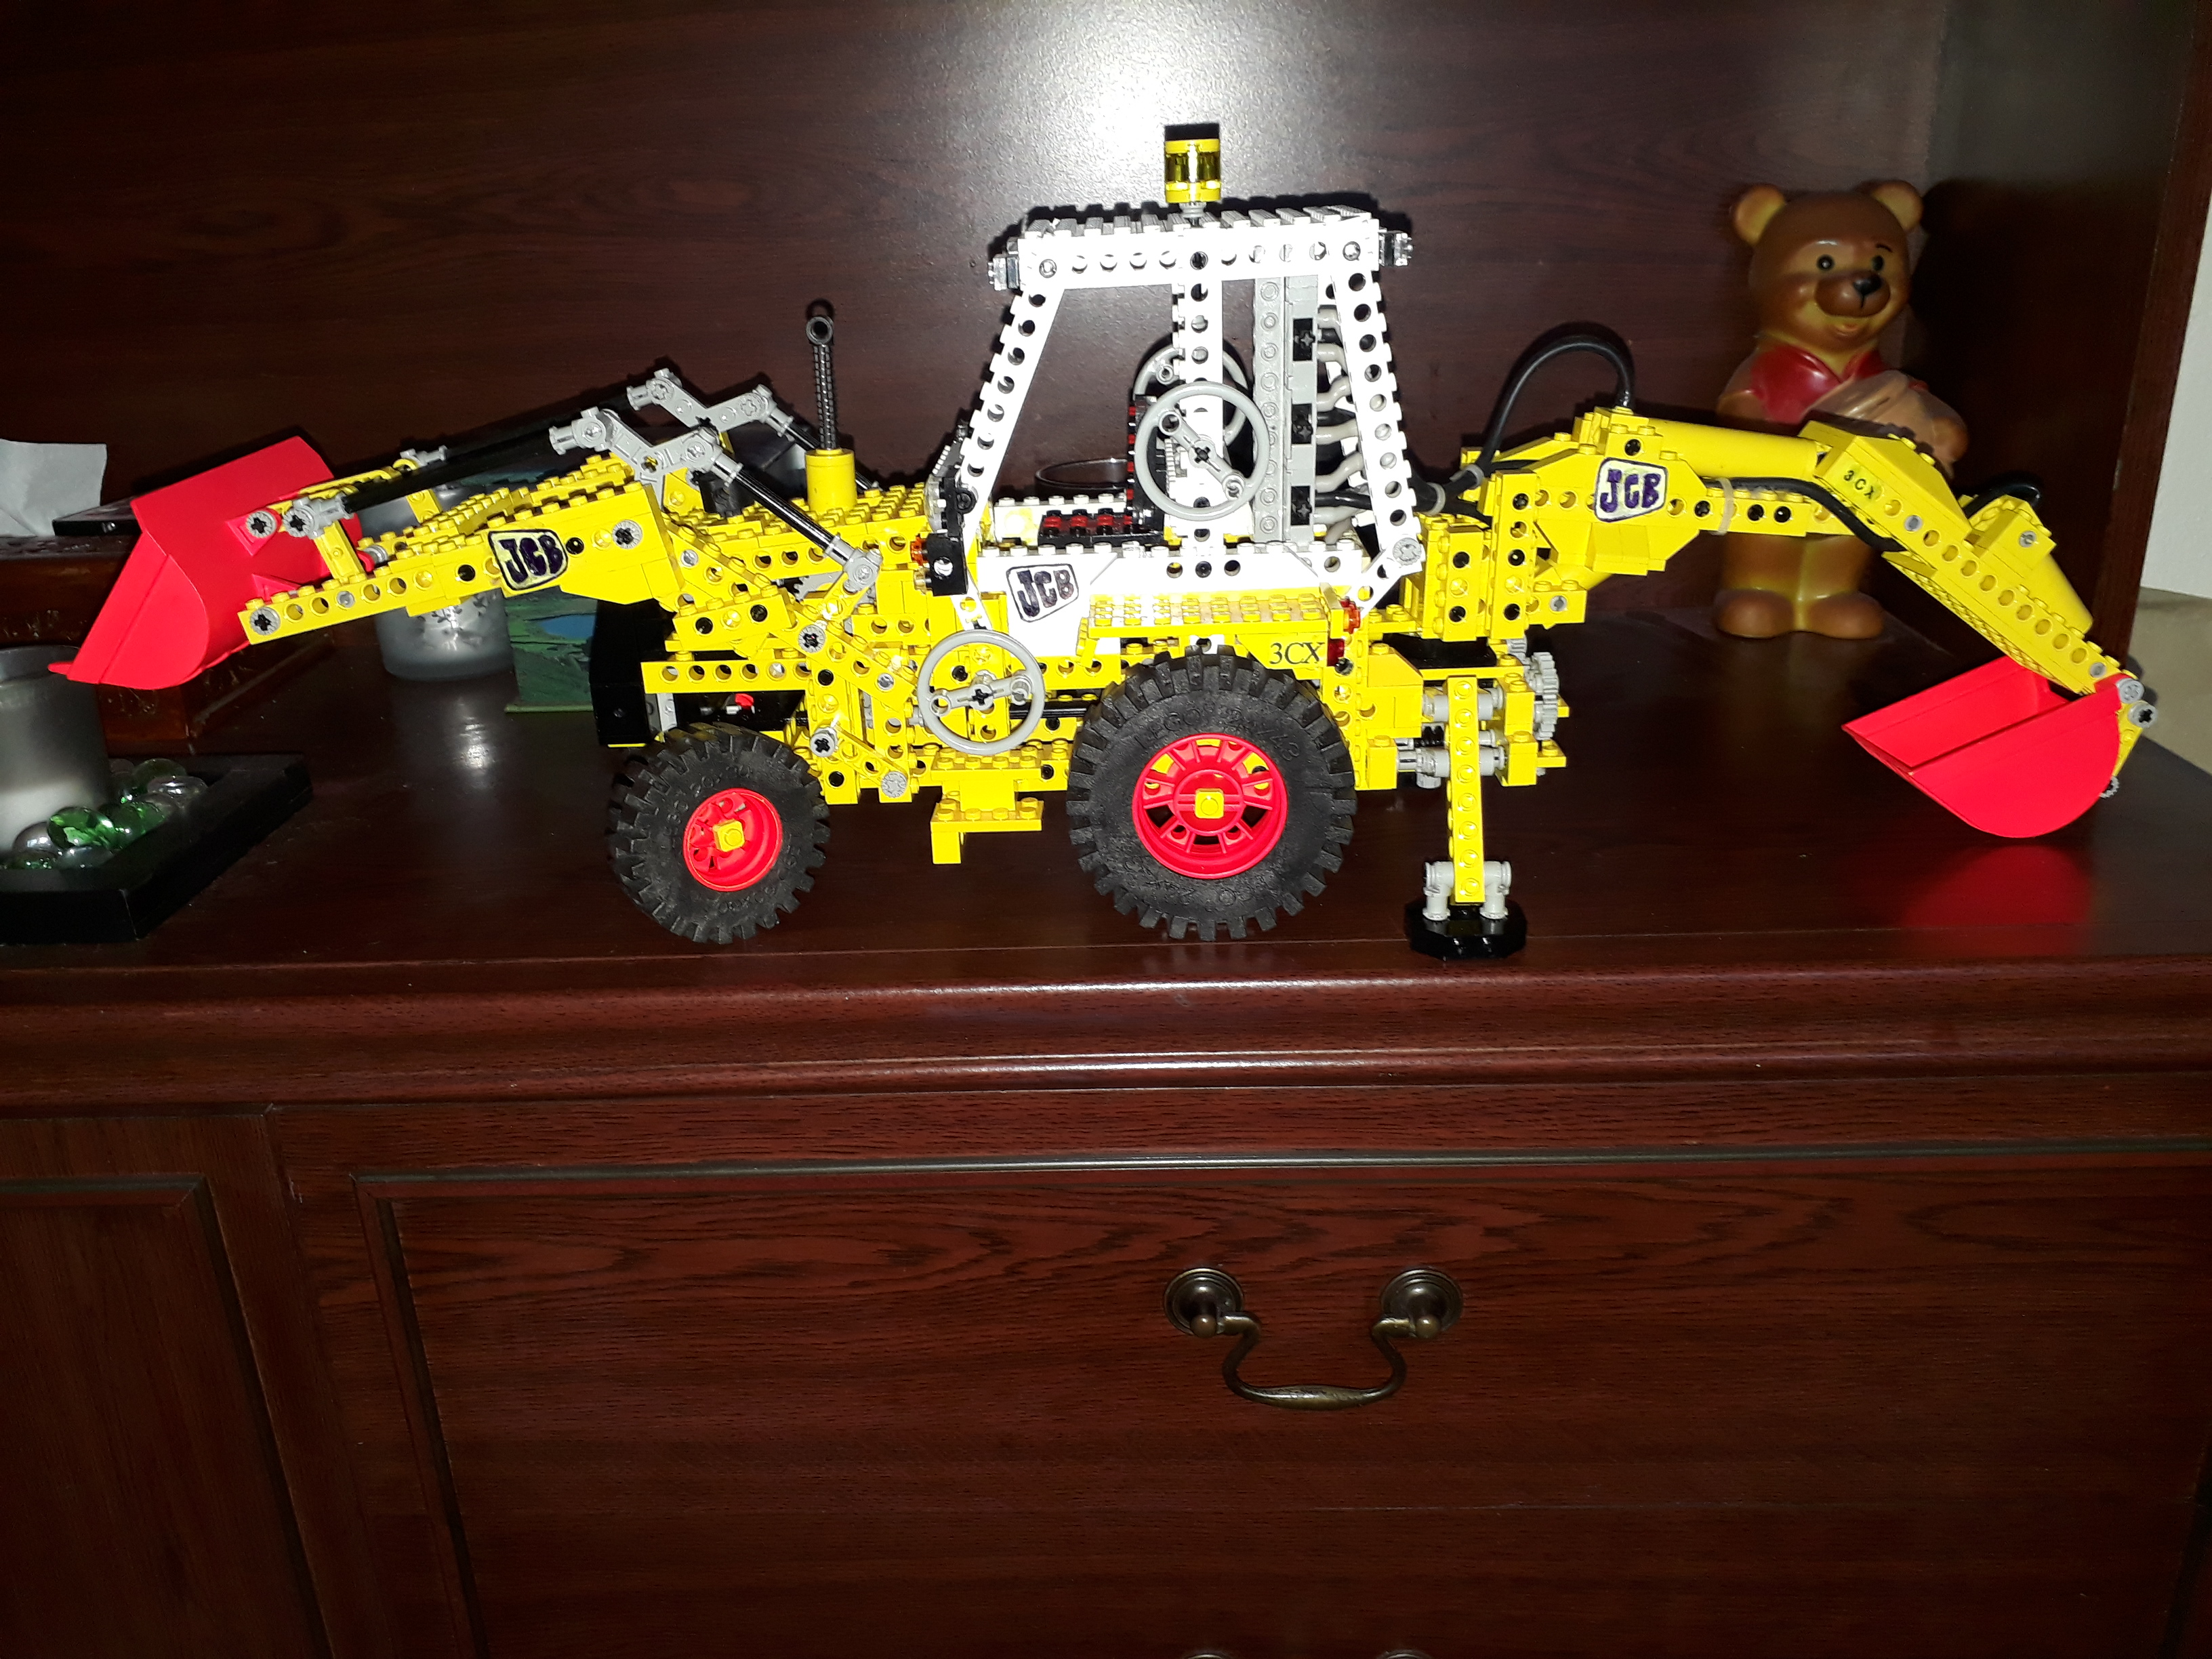
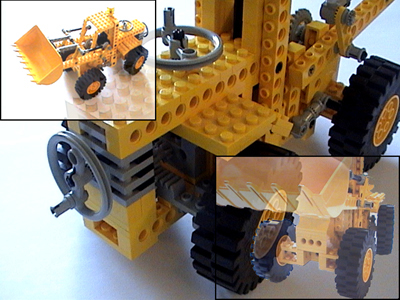
PIMPED BACKHOE GRADER! A good customer of ours from Leeds has kindly sent us the following pics of his recently completed MK 1 JCB.
This white cab JCB utilises Lego set 8862 Backhoe grader as a base but now has modified cab, wheels, buckets and
more to replicate the vintage MK1 JCB. I know its creator has performed miracles making this model as many of the parts required
modifying, repairing or colour changing - The detail changes even run to JCB stickers and number plates which really helps
to complete it...why didn't the Lego company think of branded stickers and a number plate for the 8862
set - an opportunity lost?...ah well, the shortfalls have now been addressed and this model is unmistakably the
classic JCB with its white cab, red buckets wheels and yellow hubs.

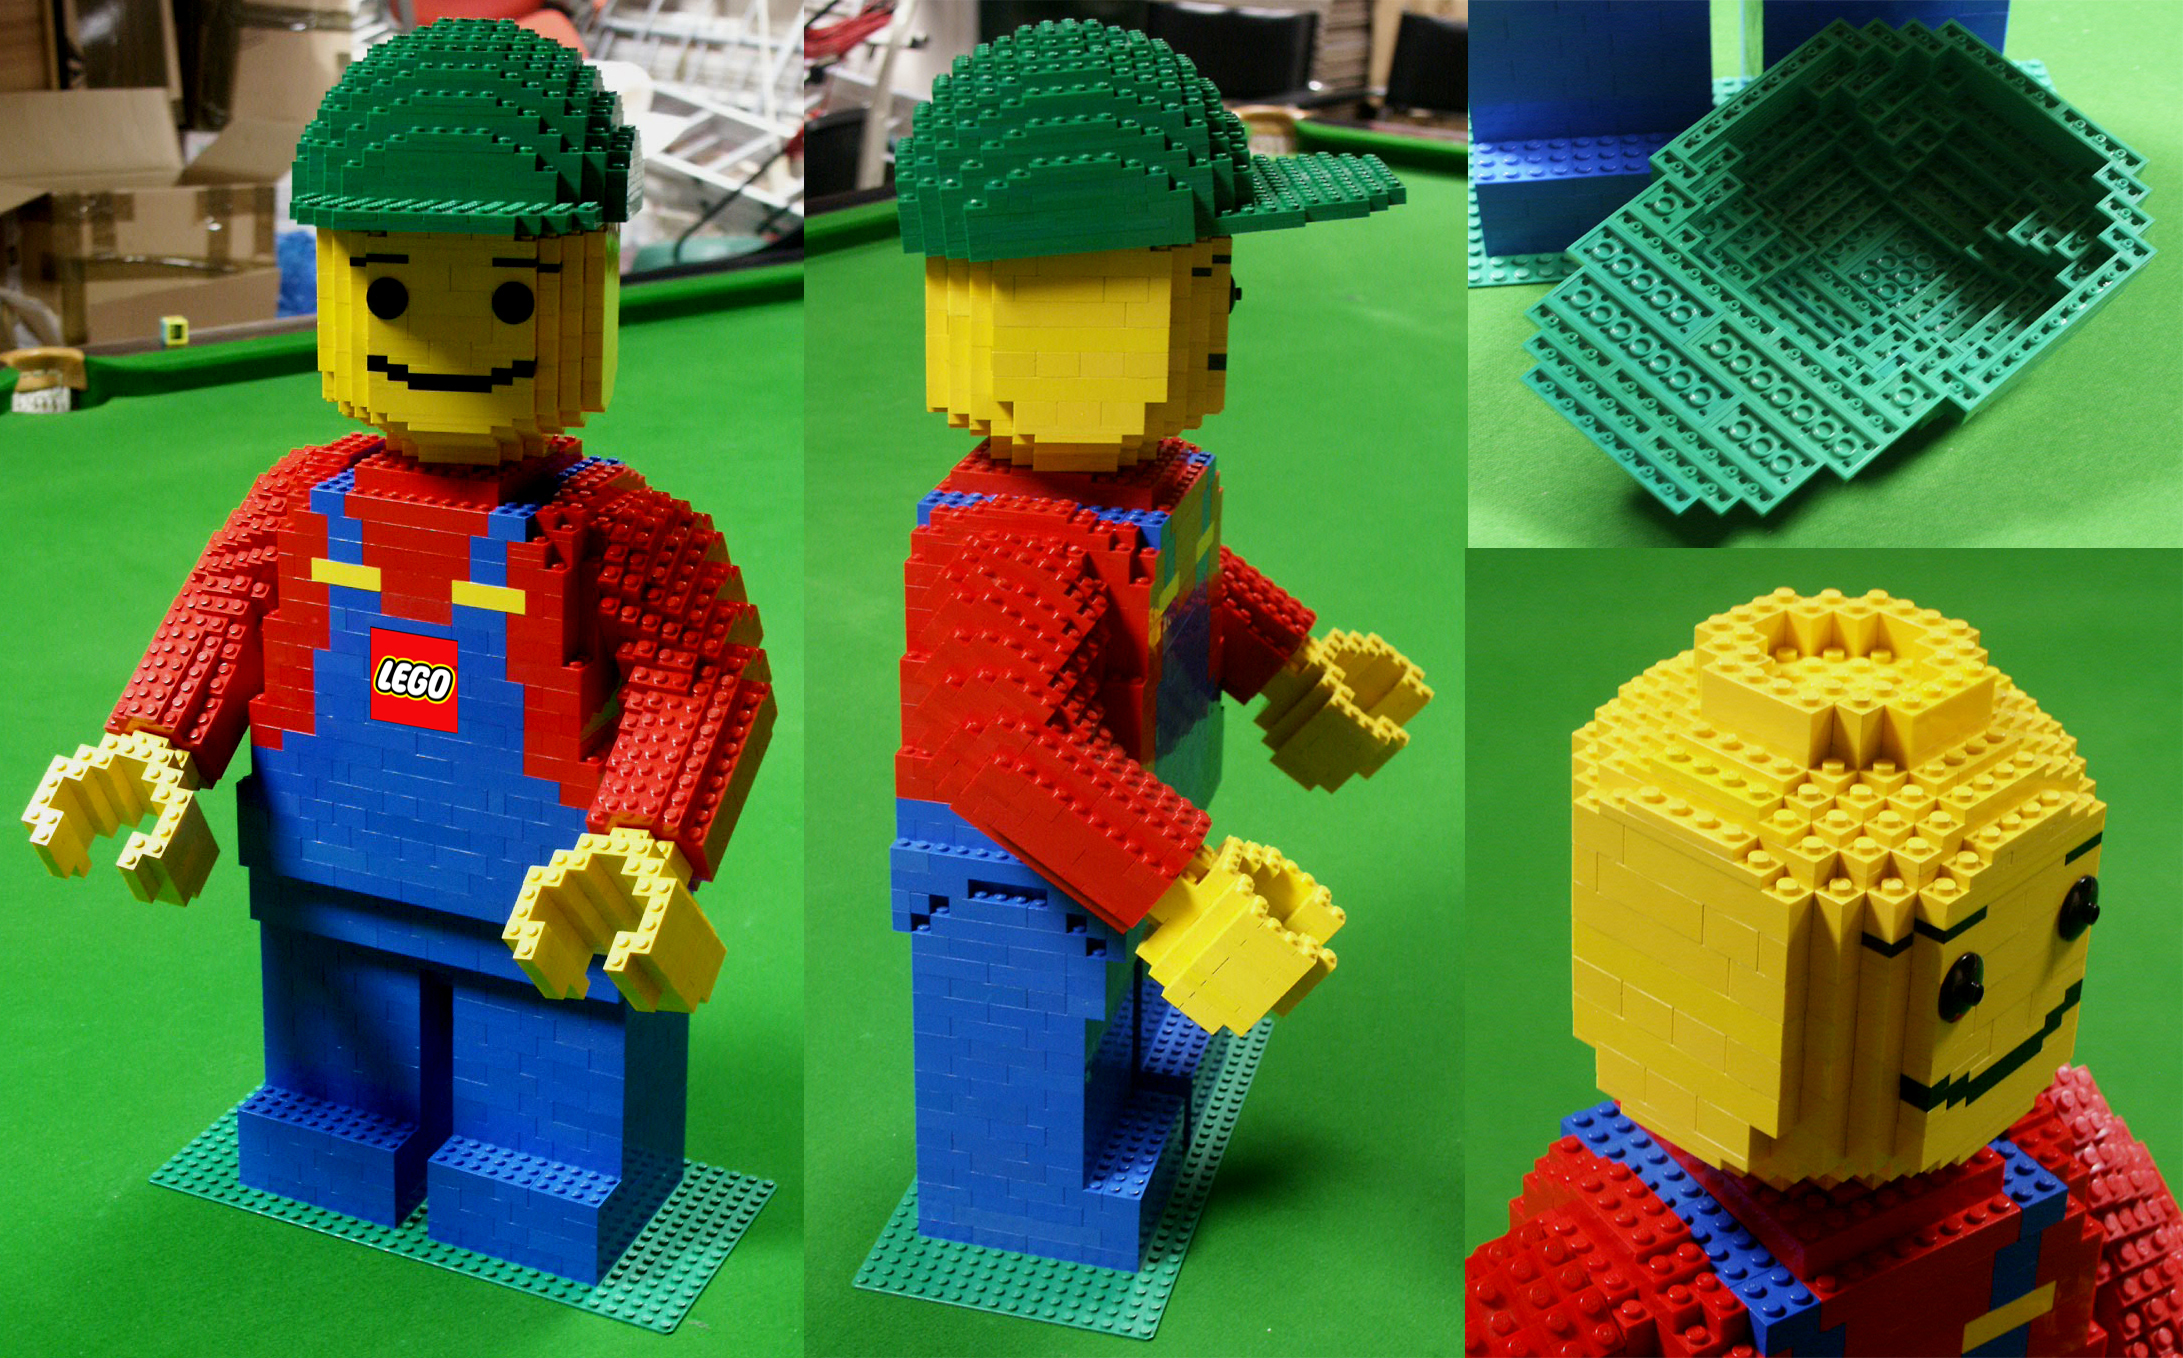
HUGE Lego minifigures! I have just completed the build on 3 large minifigure scultpures following the instructions for set 3723. We
stock thousands of sorted parts so we are in a position to build some of the bigger models when time permits. This model contains
around 2000 parts and weighs more than 4kg and it took nearly a week to build three of them! The parts used were carefully
selected for good clean quality so the finished models look pristine and highly presentable. More than most Lego models this
huge minifigure really is an attention getter and grabs everyone that passes - even people that have no interest in Lego
think its great and want one! The build is very tedious but the design makes for a very sturdy and robust model and although
the function is limited the quality of the design and its impressive scale makes it a thrilling and interesting model
to view and explore.
At some time, that dusty box
of Lego parts in your attic that holds so many childhood memories has to be dusted off, opened up, explored and enjoyed again! Frustrated at the difficulty of sourcing replacement parts for my own sets is how Spareblocks.com was born more
than 10 years ago. Re-living the memories of Lego birthdays and Christmas's past is not a unique desire, and from personal
experience, the thrill of building an old Lego set is no less enjoyable than when you first did it all those years ago...maybe
its even better! When you think of why Lego is so special, it is no surprise that so many of us
(grown-ups) hit the floor and shuffle through plastic parts for hours on end surfacing occasionally to ease leg cramps and
grab a fresh cuppa. Lego is so well made and the sets are so ingeniously designed...the precision and simplicity of the system
is unlike anything else in life, and yes, even the instructions make sense and are easy to follow! The
average age of our customers is somewhere between 30 and 60 and many are in the process of living Christmas's past
after rediscovering their Lego collections. Discovering that a few pieces are broken, chewed
or lost is soul destroying, and of course that's where Spareblocks.com comes in. Receiving the correct and authentic replacements
needed to complete your model is priceless as owning an unfinished set is pure mental torture! After crawling around in the attic, shuffling around the floor and clicking parts together for an age, that completed
model took some work and skill to complete! you tolerated your families annoyance that the lounge light was
permanently on all evening and they couldn't watch their favourite soap properly for your head bobbing in front of the
TV. With an eagle eye, you searched the internet and found the perfect supplier for your missing parts (that's us), found
and ordered the right items and finally completed the mission to perfection. Although now filled with inner peace and contentment,
don't expect the family to be the slightest bit impressed or interested - they are still annoyed that the lawn wasn't
cut and you forgot to put the bin out! No, your accomplishment is worthy of interest, merit and may even attract envy from those
of us who really appreciate and reminisce Lego, but don't expect enthusiasm from those who tolerated the sight of
your builders bum for 3 full days! On this page, we hope to feature some success stories
and finished projects that may inspire, interest, enthuse and finally get your project the interest it deserves! Personally,
I have considerable interest in hearing the stories behind Lego projects and as a 40 something year old that has
loved Lego from being barely 4 years old I relate so readily to the pleasure of resurrecting a vintage set and reliving those
warm and happy memories of childhood. I get many people that write to me to update me on their progress and success with whatever
project they are currently undertaking. I believe these stories and pics are well worth sharing and much appreciated by others
that share our sentiments towards Lego, so if you would like to share your own story, send us the details as we would
love to feature it here on this page. To get us started, David Wardle of New Zealand updated
me on his own personal Lego mission after buying replacement parts from us - its a great story, and I hope you enjoy reading
as much as I did.
Overall rating✭✭✭✭✭ Building experience✭✭✭✭✭ Parts✭✭✭✭✭ Playability✭✭✭✭✭ Value for money✭✭✭✭✭ My first and favourite Lego Technic set Written by flagsnz (AFOL) in New Zealand This is my first Technic Lego set which was given to me when I was 12 years old in 1980. My father travelled
to Norfolk Island which is a duty free island and he brought this home as a present. I can still remember sitting in my
father's cabin in the ship he worked in being amazed at this set. The size of the box and the complexity of the
build left me speechless. I can remember being overwhelmed by the technic parts and I started building the model
from step 14 which is where the more conventional building skills were needed. Step 14 and onwards is where the mud guards,
fuel tank, seat and side car are built with studded parts.
When I got home, I was able to concentrate fully and worked
through the first stages and build the chassis and engine.
Box/Instructions I don't have the box but I still have the original instructions. Parts I played
with this model and built MOCs combined with Technic set 855 Mobile Crane. Through hard use, the 16x1 and 12x1 blue technic
beams suffered. I am fortunate to have obtained replacement beams from Spareblocks.com. The model is now complete in its former glory. I even have the original Lego rubber band on the kick start. This set
included the big wheels. I believe these are Lego's biggest rubber wheels. These wheels float, and I once made
an offshore oil drill platform which floated in a swimming pool. The three wheels provided buoyancy and stability to the drilling
tower and platform. I was able to make dragsters with front wheels being made from the wheels from 855 doubled up. The build This model
remains my favourite Lego set and brings back fond memories. It unleashed years of technical creative play. The completed model The motorcycle
engine is mostly concealed underneath the red fuel tank and really can only be seen if the model is upside down. The one square cylinder
sounds great as the motorcycle drives along. Originally I preferred the model without the side car. I also took off the rear mudguard. The model looks
more like a trail bike in this configuration. Overall opinion
This model
has always taken pride of place. I am ecstatic that I have been able to return it to its original condition.
My old Lego sets are now complete again! William Hurst, UK. While visiting a car boot sale during the summer I came across a stall selling a number of vintage Lego
sets and it pressed a button in my head! As a child, I had Lego sets bought me for Christmas and birthdays and I amassed a large collection. The collection was
stored at my parent’s home in the spare room and in recent years my parents had allowed my nephew to play with it when
he stopped over. The fact that the Lego was still occasionally used cheered me up a little as I had promised myself I would
one day make up the main sets, but I just never got around to it so I felt like the Lego was being neglected. I knew some
parts were missing and broken and some were in poor condition as it was all mixed up and played with so much, and it really
bothered me that I never got around to sorting it out correctly. Seeing completed sets for sale there at the car boot sale was a perfectly timed reminder as I had just moved
house and taken 3 weeks off work...a plan was immediately hatched to collect the Lego from my parents home and devote a few
days to fulfilling my promise to get the sets back together again. My collection included many sets, but it had 3 main Technical sets that I desperately wanted to resurrect
to original built condition. Set 853 is a real old car chassis set and this was bought for my brother when he was around 12,
I was given it to add to my collection when he left home. The other sets were 8853 (Excavator/Loader) and 8865 Test Car which
was a modern version of the 853 set that I bought with birthday money. I often saved up money to buy Lego sets, and as a child,
my favourite outing was to visit Redgates toy store in Sheffield to see the latest Lego sets available...what a shame this
store closed down, it was fantastic!
|
| Lego Set 8865 |
The condition of the Lego
was worse than I had thought, it really had been well played with and much of it was 30 years old or more. I ended up taking
the parts off the instructions and I created a list of the parts that were either damaged or completely missing. I was fortunate
enough to discover the Spareblocks website and I acquired all the parts I needed to finish the models correctly (the service
was great and I would highly recommend them). I really enjoyed the challenge of building the sets and I got a great deal of
satisfaction sorting out the jumbled mess of parts, not least finally removing those annoying pens, pen tops, paper clips,
peanuts? and key rings that had somehow made home with the Lego.
|
| Lego Set 853 |
Since
reviving my old Lego sets I have occasionally bought myself small to medium sized sets to complete over holiday periods as
I find the challenge of building a Lego model extremely therapeutic and relaxing. Some people argue that Lego is expensive,
but it can provide many hours of entertainment and it can be used/built time and time again for many years, so for me, in
terms of value for money it has no competition.
|
| Lego Set 8853 |
Model 8860 created in CAD and 3D Studio I
created the graphic below some years ago. It’s a 3D computer
generated model of the classic 8860 car chassis model (1980). Each brick was individually
drawn in 3D and pieced together on the computer before being rendered. There's
nothing inventive or creative here, but I enjoyed creating the model on the
computer even though it took considerably longer to assemble than it
would have with the real pieces. Perhaps others out there have created
computer generated Lego models either replicating Lego's own classic sets, or perhaps featuring their own
designs - if so, submit them so we can all enjoy viewing them...

|
| 8860 Car Chassis |
Send your own Lego stories along with pictures or
video to info@spareblocks.com - if we really like what we receive we may send you something in the post as a thank-you, so include your full postal address!
|
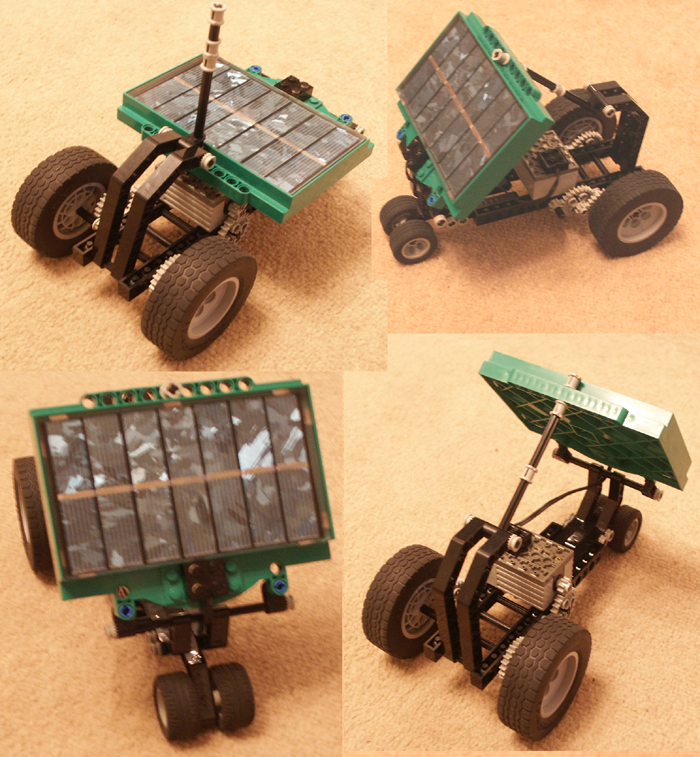
| Solar vehicle |
The sun was shining,
and I had a sudden desire to make something. This model took well under an
hour to build, test and adjust. Considering my limited time, it works
very well. The gearing is set just right for optimising the motor fed from this small Lego
solar panel. The panel can be adjusted easily and safely to face
the sun and the soft tyres mean it crawls quite smoothly and firmly even
on sloping or rough surfaces! Between picking and packing Lego parts for customers, I have very little time,
so my solar vehicle is a little basic. maybe we have some experts
or younger builders out there who could show us how it should
be done?
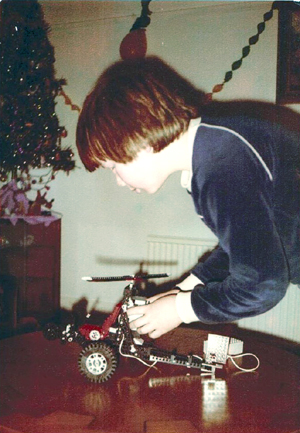
The above image shows a
picture of me (Carl / Mr Spareblocks.com) back in 1981 showing off my free-style built
Autogyro. I was very proud of my model as I invented a way of adjusting the rotor
blades and tail fin with the use of sleeved plastic rods I made myself. I wrote to Lego several times about my ideas (I hoped
to be a designer for Lego when I left school, but I never got a response to my letters - I was quite naïve!).
Lego invented a similar connecting method to mine some years later and other ideas
I had in the early eighties also came to pass. Back in the eighties, the number of parts available was far
more limited and it was frustrating to be left without the bits I felt were needed, but the upside is that I
learned a great deal about design and making prototype parts. Maybe we have some other Lego builders
out there that have also invented new parts or new methods, improvements or shortcuts for their models... if there
is, we love inovation, so please share.
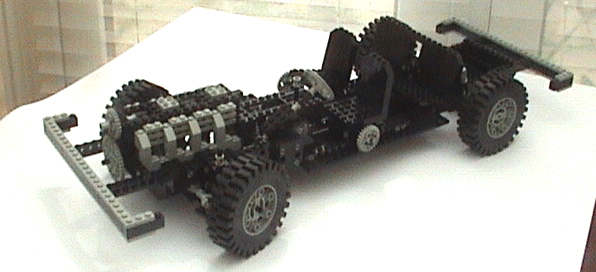
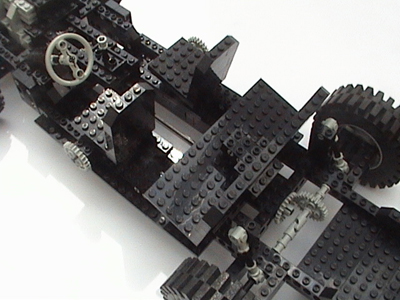
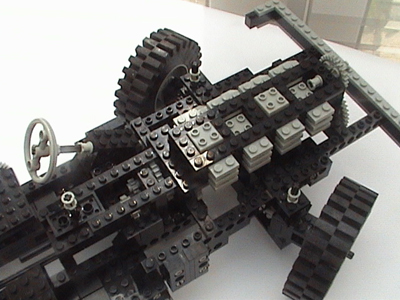
Lego's classic 853 car chassis built with
black parts Lego's 853 model marked the
start of the technic car era. The design of the car was relatively basic but it introduced a scale not seen before - moving
pistons, working steering, rudimentary gear box and those classic large scale wheels. The design was very playful in terms
of colour - the main chassis was formed in red beams and plates, the engine and gearbox were built from grey and blue parts
and the seats and exhaust were yellow. If you ever wondered how the model
would look if built using only black and grey parts, then wonder no more. The images below are of an exact 853 build using
black parts throughout while maintaining the original grey detailing. The 16 x 6 red and yellow plates used in the original
model are prone to breaking and are generally a less common part. Black 16 x 6 plates are relatively common as are the black
technic beams, so constructing the model using black parts could be a practical way of building the model if you don't
have it in your collection! full build instructions for this set are readily available online - visit peeron.com if you wish
to view or download them.
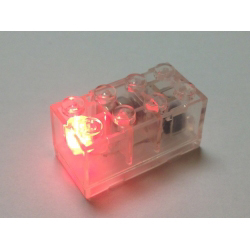
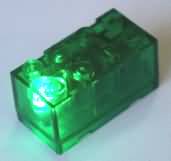
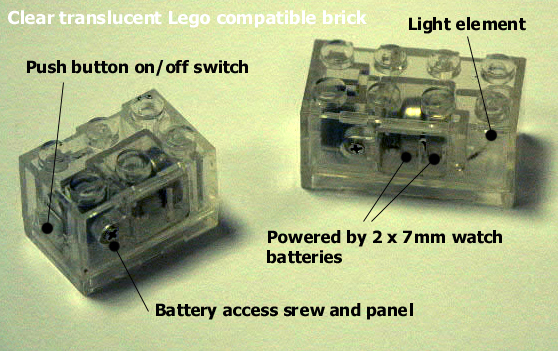
Lego compatible light blocks We stock a range of Lego compatible light bricks which we sell for very little over cost
- they are available elsewhere, but to the best of my knowledge we sell them far cheaper than any other retailer. These
items are a good edition to any Lego collection and a perfect addition to any order for spare parts.
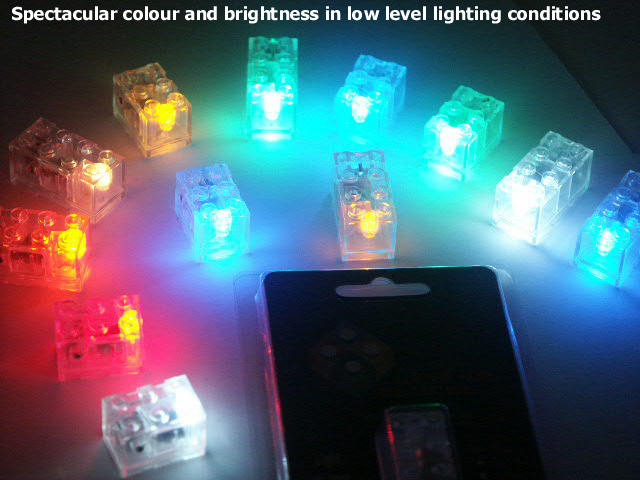
More information / specification
The
quality of this product is high and demand has grown, so we have obtained further
stock and we have extended the range to include a selection of through colour bricks. Stocks are still limited, so
please don't order more than is shown available. These items are new
and unused and shipped with batteries installed (pull out plastic tab
to commence use).
# Lego compatible size
# Sizes 4 x 2 and 3 x 2 peg
modules
# Made from robust precision made clear translucent / coloured translucent
plastic
# No wiring / cables or batteries needed (batteries included)
# Twin lithium cell batteries included to give great battery life
(although not intended for continuous use, as a guide, these items will work for over 200 hours continuously (naturally
brightness will fade as batteries wear))
# Various coloured lights available
including flashing different colours (RBG), and through colour bricks
# Batteries
can be changed via small access panel and batteries are readily available (we
sell batteries here on this page - see item DE100)
#Integral on/off switch to rear of brick - can be operated
with Lego axle or similar
# Fully recessed switch so brick can be fully built-in
to models
All bricks toggle
either on or off using the rear switch. Only the multi colour version has a patterned flashing sequence
(red, blue and green) - e.g. the plain colour lights do not flash. Coloured bricks shine the
colour of the brick. These items are difficult to photograph in terms of accurately
portraying colour but the light and brick colours are vivid, and add warmth,
and interest to Lego or compatible building brick projects.
Click
on the image below for a closer look.
Click here to see and buy from our range of Light blocks
20 things I really hate a lot:- - Writing in red
- Rubish gramma
- Spelling mistakes
- Lists
- exaggeration
- Irony
|
|
|
|
|
With over 220 pages of different Lego parts, our customers tell us our site is refreshingly
easy to navigate and contains the most comprehensive range of parts from a single supplier - we hope you too find
all the parts you need. To get started in your search, choose a category from the menu tabs on the left. New
and older versions of Lego parts often vary by design and colour, so if you are replacing parts on an older set,
new parts may look out of place - email us after checkout with the set numbers you have bought your parts for and we will
make sure we dispatch the correct/genuine variants you need. We always go the extra mile where we can as we value customer
satisfaction and the positive feedback we get. Whether you are here to buy parts or not, we hope you enjoy looking through
our interesting and varied inventory of parts. If you encounter any difficulties or have a query, feel free to email
us at info@spareblocks.com If you would prefer to search the site using key words a search bar that will search the entire site
is located at the top of page B.
|
|
|
|


